With so many source control options out there, it can be a daunting task in choosing one, especially that you enjoy using and integrates well with your development environment. In recent years, the open-source mecca GitHub has taken over as a premier repository for allowing users to store, develop, collaborate and share code.
The .NET Development team has clearly taken notice and with the release of Visual Studio 2012 Update 2 have made it incredibly easy to integrate Git (and GitHub) into Visual Studio to allow you to easily commit, push, pull and all the other verbs that you can think of without ever leaving the comfort of Visual Studio.
This post will cover the steps necessary to easily get GitHub up and running within Visual Studio 2012 so you can start sharing your code and using Github to handle your source control needs.
What You Will Need
- Visual Studio 2012 (any versions including Express Editions)
- Visual Studio 2012 Update 2
- Visual Studio Tools for Git
- A GitHub Account
Getting Started with Visual Studio and Update 2

The first step in getting started on this journey is to actually install Visual Studio 2012 if you haven’t already. If you don't have a Professional edition or above, you can always download the free Express Edition at the following link :
After getting that out of the way, you’ll need to make sure and download the all-important Visual Studio 2012 Update 2. This update includes a variety of improvements and features to nearly all facets of development within Microsoft's flagship development environment which include :
- Upgraded Agile Planning and Development through Team Foundation Server.
- New and Improved Quality and Unit Testing Features.
- Additional Templates for Facebook and SPA Applications and significant enhancements to SignalR functionality.
- Page Inspection and Mobile Emulation for Improved Cross-Browser / Platform Testing through BrowserStack.
- Code-mapping, IntelliTrace and Workflow enhancements and improvements.
Basically just go download it from the following link :
From Getting Ready to Git-Ready
The Visual Studio Tools for Git is an extension for Team Explorer that allows Git integration for any Git-supported source-control repository including third-parties as well as local repositories. It will allow you to easily track changes within your repositories, commit changes, view branches and other changes and basically any additional functionality that you would have from a fully-featured source-control environment.
To get started, you'll just need to download the Visual Studio Tools for Git extension below :
After installing it and creating a new Project, you should see an option available to Create New Git Repository :
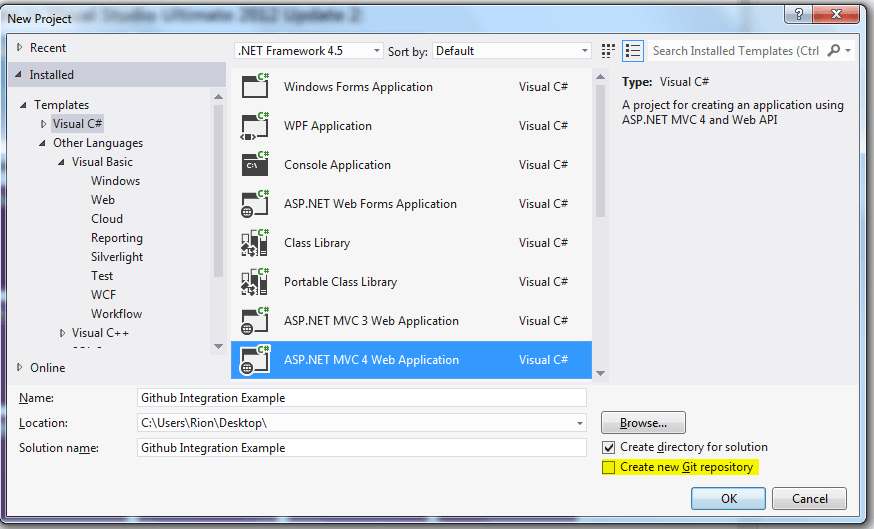
This will create a new Git repository for this project on your local machine, which you will notice by right-clicking the Project within your Solution Explorer that you now have several new options within your context menu related to source-control features within Git :

And by accessing the Team Explorer option from the View Menu (or by using the CTRL+,CTRL+M shortcut) you can see the specific Git Settings for your Project as well :
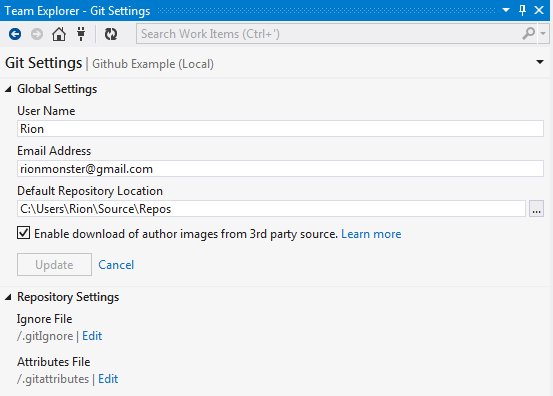
By digging around within the Team Explorer, you can see all of the other functionality that the Git Extension offers, such as Change Tracking, Commits, Merging etc. I encourage you to play around with it and get used to navigating between all of the options to get a feel for how it integrates with Visual Studio.
After making a few changes to your sample application, you will probably be ready to perform your initial commit, which is just as easy as it sounds. You’ll just need to right-click on your Project and choose Commit :
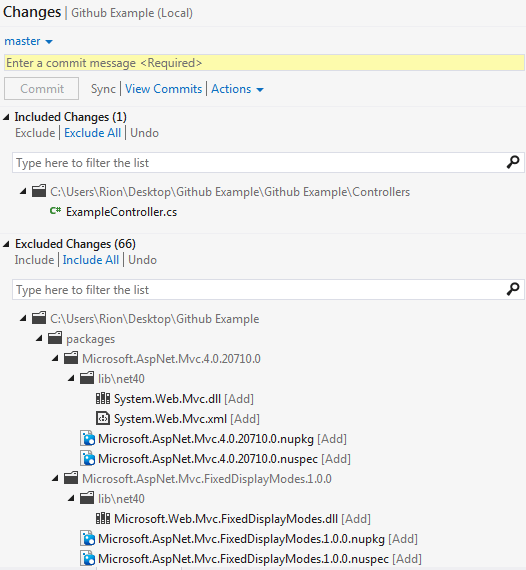
Next, we will hook up with GitHub to actually push our code up.
When Push Comes to Shove
As I mentioned earlier, you’ll need to head over to GitHub to create an account there. It’s free and is very easy to use, although keep in mind the code posted on there using a free account will be publicly available.
After creating an account, you can make a simple repository that will be used to push your existing local repository to :
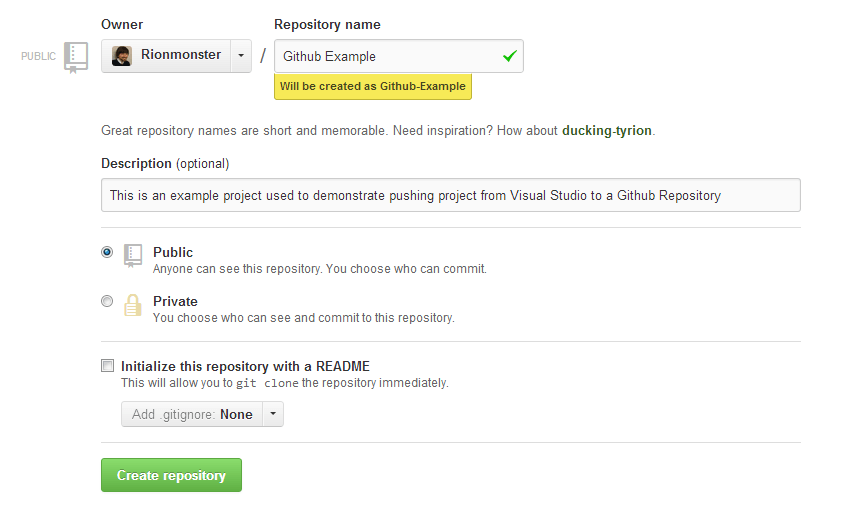
After creating the repository, you’ll be presented with a page that will display the name of your repository on GitHub along with a variety of other instructions regarding actually pushing and committing the repository as well. This will be used as your reference for all of your remote push requests. For instance, the repository created in this example would be :
https://github.com/Rionmonster/Github-Example
Which is basically all that we need to actually handle pushing our local repository up.
Old School (Command-Line) vs New School (GUI)
There are two options available to handle pushing our local repository :
- Push using the GUI through Visual Studio 2012
- Push using the Git Command Line Prompt (available through Visual Studio 2012 as well)
Using the GUI is fairly straight-forward and can be accessed by simply clicking on the Commits option available within the Team Explorer :
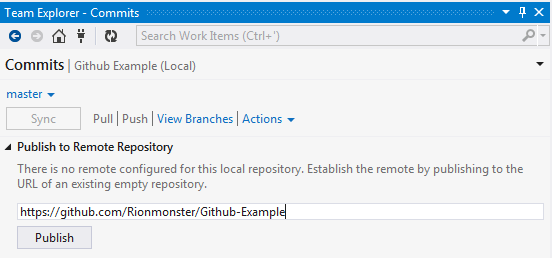
The command-line option functions just the same way and requires just a few more characters than the GUI option. You can access the command-line prompt from nearly any area within the Team Explorer that contains an “Actions” option, which will have an additional option called “Open Command Prompt” :

Within the command-line, simply use the following syntax to perform your push :
git remote add origin https://github.com/Rionmonster/Github-Example.git
git push -u origin master
You can find the exact syntax available on your repository page within GitHub as well.
Push it. Push it real good.
When pushing, you will likely be required to authenticate through GitHub, but after entering in your credentials, you should receive a message that looks like this :

By traveling over to your repository on Github, you will find that it contains all of the files within your local solution :
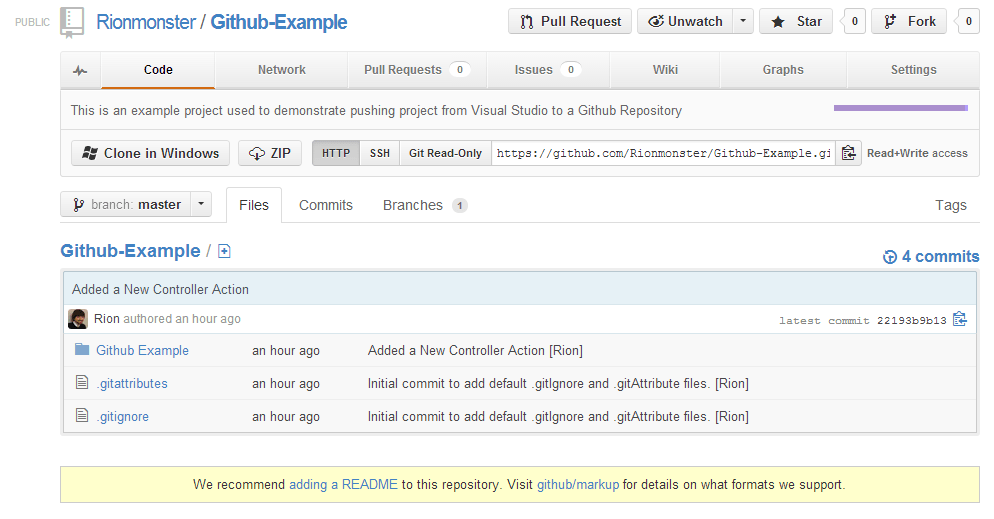
Tada! All of our files from our local repository are now available on Github for anyone to access, contribute, branch and all that other wonderful jazz. Another great thing is that after your initial push, you will no longer be prompted for credentials so you can now push up to Github with a single click!
Git-ting Better All The Time
Although everything isn’t completely perfect with the Git support (as it was released rather recently), the .NET Development team will still continue to improve it as they do with all of their products and releases.
I encourage you to give it a shot, as I have found that it has made my life a bit easier and I hope that it can help do the same for you.